- Introduction
- Requirements and Preparation
- Step 1 - adding the search form
- Creating SearchController
- Creating Search Index
- Doing the search
- Creating the view
- Conclusion
- Additional Links
- Bonus: Pagination with CPagination
- Another pagination solution
Introduction 
For this tutorial I will add a search to the blog demo. The search would be based on Zend Lucene.
Requirements and Preparation 
- Yii framework - I will work with the current version yii-1.1.8.r3324 extract the archive in your server...
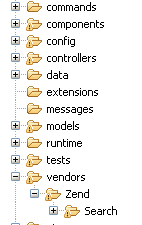
Now go to your yii-1.1.8.r3324\demos\blog\protected directory and create there a vendors directory In vendors directory you should put Zend Framework library, For this you will need to download it After downloading copy the Zend directory that inside library (with Zend directory inside) to vendors Should look like this now (I copied only Search directory...):

add under runtime directory, a new one call it search, it will be used for the index files that Zend Lucene will create. Make sure it is writable!
Step 1 - adding the search form 
For this we will create a widget or if to be more specific a CPortlet! The most simple way is go to your components directory, create SearchBlock.php file And copy inside code from tag cloud. change class name to SearchBlock. Now lets insert it ! Go to views/layouts/column2.php add this, abouve the TagCloud widget
<?php
      $this->widget('SearchBlock', array(
      ));
?>
after saving you will see 2 tag coulds in your main blog page... lets now edit it and change it to some search form
Now lets change the SearchBlog widget code...
<?php

Yii::import('zii.widgets.CPortlet');

class SearchBlock extends CPortlet
{
	public $title='Search';

	protected function renderContent()
	{
	       echo CHtml::beginForm(array('search/search'), 'get', array('style'=> 'inline')) .
		CHtml::textField('q', '', array('placeholder'=> 'search...','style'=>'width:140px;')) .
		CHtml::submitButton('Go!',array('style'=>'width:30px;')) .
		CHtml::endForm('');
	}
}
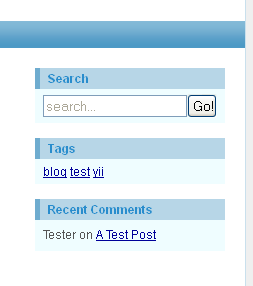
It will look like this:

Creating SearchController 
Now lets add a SearchController
<?php
class SearchController extends Controller
{
	/**
	 * @var string index dir as alias path from <b>application.</b>  , default to <b>runtime.search</b>
	 */
	private $_indexFiles = 'runtime.search';
	/**
	 * (non-PHPdoc)
	 * @see CController::init()
	 */
	public function init(){
		Yii::import('application.vendors.*');
		require_once('Zend/Search/Lucene.php');
		parent::init();
	}

    public function actionCreate()
    {
    }

    public function actionSearch()
    {
    }
}
As you can see in the init method we import Zend from vendors and we require the Search Lucene
It has two actions Search and Create For this tutorial I don't need more... but you can add update for example to update the search index ( of course you should implement it) etc.
It is a time to mention the documentation for Zend Lucene Here To do more advanced stuff, you will need to learn it
Also the api for the Lucene class
Creating Search Index 
This is an example of blog array after AR findAll
'id' => '2'
'title' => 'A Test Post'
'content' => 'a lot of text'
'tags' => 'test'
'status' => '2'
'create_time' => '1230952187'
'update_time' => '1230952187'
'author_id' => '1'
This is how we create the index:
/**
	 * Search index creation
	 */
    public function actionCreate()
    {
    	$index = new Zend_Search_Lucene(Yii::getPathOfAlias('application.' . $this->_indexFiles), true);

    	$posts = Post::model()->findAll();
    	foreach($posts as $post){
	    	$doc = new Zend_Search_Lucene_Document();

	    	$doc->addField(Zend_Search_Lucene_Field::Text('title',
                                          CHtml::encode($post->title), 'utf-8')
            );

            $doc->addField(Zend_Search_Lucene_Field::Text('link',
                                         	CHtml::encode($post->url)
												, 'utf-8')
			);

			$doc->addField(Zend_Search_Lucene_Field::Text('content',
                                          CHtml::encode($post->content)
                                          , 'utf-8')
            );


			$index->addDocument($doc);
    	}
	    $index->commit();
	   	echo 'Lucene index created';
    }
First I found all the posts with Post::model()->findAll(); and than I added post to search index one by one, his content title and link fields
Now you should navigate to http://localhost/yii-1.1.8.r3324/demos/blog/index.php/search/create And you will see "Lucene index created"
Doing the search 
public function actionSearch()
    {
    	$this->layout='column2';
   		 if (($term = Yii::app()->getRequest()->getParam('q', null)) !== null) {
	        $index = new Zend_Search_Lucene(Yii::getPathOfAlias('application.' . $this->_indexFiles));
	        $results = $index->find($term);
	        $query = Zend_Search_Lucene_Search_QueryParser::parse($term);

	        $this->render('search', compact('results', 'term', 'query'));
	    }
    }
Creating the view 
Create views/search/search.php add there
<?php
$this->pageTitle=Yii::app()->name . ' - Search results';
$this->breadcrumbs=array(
	'Search Results',
);
?>

<h3>Search Results for: "<?php echo CHtml::encode($term); ?>"</h3>
<?php if (!empty($results)): ?>
			    <?php foreach($results as $result):
?>
					<p>Title: <?php echo $query->highlightMatches(CHtml::encode($result->title)); ?></p>
			        <p>Link: <?php echo CHtml::link($query->highlightMatches(CHtml::encode($result->link)), CHtml::encode($result->link)); ?></p>
			        <p>Content: <?php echo $query->highlightMatches(CHtml::encode($result->content)); ?></p>
			        <hr/>
			    <?php endforeach; ?>

			<?php else: ?>
			    <p class="error">No results matched your search terms.</p>
			<?php endif; ?>
As you can see because I passed to the view the $query, I can use Zend's highlightMatches ...
(if your search results not in english, you might have some encoding issues with highlightMatches, so you might consider using your own highlighter for greater flexibility and encoding issues free)
Also I created a real link from the linked I passed and created via
$doc->addField(Zend_Search_Lucene_Field::Text('link' ...
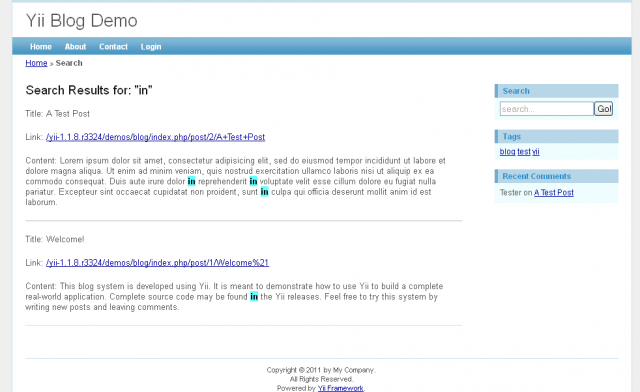
And thats it try to search the word "it" And you will get:

Conclusion 
Now we are done, we have our search working... As you noticed I don't explained a lot about Zend Lucene itself... So you should look at the links I gave, and try to learn about it more!
Additional Links 
- larry ulman's artice about Zend Lucene
- Zend Lucene documentation
- Good article 1
- Good article 2
- Good articles 3
Bonus: Pagination with CPagination 
As some one here added in the comment, pagination can be a little tricky... You need to do some calculations by yourself...
Actually it is always a dilemma if to give you find the trick yourself, or give it to you directly...
There is a very big danger if you always get the answers for your problem from others... because in real time job, no one will do the job for you...
So this is how it would look with CPagination, after you figure out how to do the pagination of the result yourself:
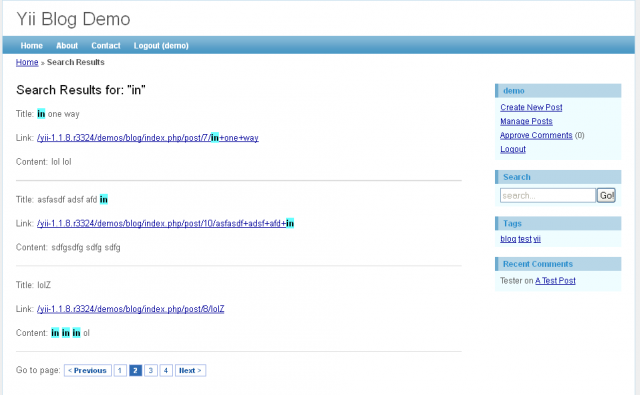
(The page limit is 3 per page)
So dont continue reading, until you spend some time thinking about it and trying your self!
Add to search
$pages = new CPagination(count($results));
$currentPage = Yii::app()->getRequest()->getQuery('page', 1);
$pages->pageSize = 3;
In the view change the foreach view with for
<?php for($i = $currentPage * $pages->pageSize - $pages->pageSize, $end = $currentPage * $pages->pageSize; $i<$end;$i++):
?>
					<p>Title: <?php echo $query->highlightMatches(CHtml::encode($results[$i]->title)); ?></p>
			        <p>Link: <?php echo CHtml::link($query->highlightMatches(CHtml::encode($results[$i]->link)), CHtml::encode($results[$i]->link)); ?></p>
			        <p>Content: <?php echo $query->highlightMatches(CHtml::encode($results[$i]->content)); ?></p>
			        <hr/>
			    <?php endfor; ?>
and add after this
<?php $this->widget('CLinkPager', array(
    'pages' => $pages,
)) ?>
It is not perfect, but it is the start. The problems you should think about are: what to do if some one tries to access page number 40 ? now it will throw error 500
What will happen if you have 2 pages, but only 4 records? You will get undefind ofsset errors...
Consider this as homework ;-)
p.s. don't forget to add some blog posts or you will have nothing to paginate ;-)
Another pagination solution 
Actually if you want it pass between pages via ajax, and don't handle the offset issues etc. ( it is easy but... we still most likly want ajax)
So you can consider doing the pagination via CArrayDataProvider You have there example http://www.yiiframework.com/doc/api/1.1/CArrayDataProvider Just pass the result array than you can create CListView with some basic view for search result element, and you are done... CArrayDataProvider will do all the dirty work for you!
 Jesus Carrasco
paging
nice solution. I've used this search in all my projects.
have you solved issue with CPagination ?
Re: paging
raa - it is not an issue, it is a little bit tricky but it is easy...
I added an example of how to do it, but you should be able to think about that yourself - so before looking at the solution - you better think yourself.
Nice
I have been wondering how to implement search.
Thanks
This is awesome, thank you
nice
really nice, useful, thanks!
Search for all objects, scope, permissions...
Thanks a lot for this wiki.
Could you please expand this wiki with explanations/examples how to implement the following features:
1) Make search for all objects in DB.
You described the search only for Post object. But many apps require a global search for all objects. For example DB schema: Accounts->Companies->Projects->ToDos->Tasks->Comments. Projects, ToDos and Tasks have 'title' and 'description' fields. How to organize the search for all these fields + content of comments and get it like one result set.
2) Restrict the scope of searching by user permissions: objects of projects to which user have not access (table Projects<->Users) must not be included in search results.
Thank you in advance.
displaying result problem
hi bro..
thanks for this useful tutorial..
i have a problem how to displaying the content in a couple line only...
i have a content that contain a lot of text, it's so annoying if i displaying all the text contained..
so do you have a solution how to minimalize the words, maybe only a couple of line...
thanks anyway
Pagination error
Hey am trying to do pagination the way you did it but my i contently stays at -1,-2,-3 starting from the bottom, any reason for that?
Hehe
Thanks for your great tutorial.
I have one question
I had used this search features in my demo project previously. Recently I need to used in real project and I found this when i searched through the net. I tried it, it works fine for some search parameter also throws exception errors too. Further more I can't use
CleanHtml function to clear out html tags in the description section. Thats why I moved to another search approach with CDbCriteria and that work fine for with simple like condition.
So my question is why to use zend search rather than using simple cdb criteria.
Where are index files created...
Great tutorial... just one quick question where does Lucene create the index files. How can I check the contents of this index after the create index function
is called.
Vaibhav
true download link
when i try this link: http://www.zendframework.com/download/latest
get error 400
for true link replace download with downloads:
Download Latest Releases zend
But I did not find the folder search and got the following link :
http://framework.zend.com/svn/framework/standard/trunk/
trouble with accents (é, î ...)
I had lot of problems with highlither and display, can't finaly get it to work, i remove the text highligthing using a jquery script to do it.
Does someone managed to do it with accents ?
Index doesn't exists in the specified directory.
Hi, i did everything excatly like u said and Zend's throwing an exception:
Index doesn't exists in the specified directory.how should I solve it?
Some additions
First: thanks for your tutorial. Without it, I would have needed much longer to establish a working Lucene search. However, I have some additions:
Do not CHtml::encode the fields you pass in. You will break searching for umlauts and Lucene can cope perfectly with umlauts.
For further avoiding of umlaut problems, one should add
setlocale(LC_CTYPE, 'de_DE.utf-8'); //use your locale!
    Zend_Search_Lucene_Search_QueryParser::setDefaultEncoding('utf-8');
    Zend_Search_Lucene_Analysis_Analyzer::setDefault(new  Zend_Search_Lucene_Analysis_Analyzer_Common_Utf8_CaseInsensitive());
to the beginning of actionSearch() and
setlocale(LC_CTYPE, 'de_DE.utf-8');to the beginning of actionCreate();
You should not put links into Lucene. Why should you? Nobody will every search for parts of the url, it will just distort search results. Better save the post-id (don't call this field id, as this may cause problems, call it 'post_id' or such) as unindexed field and retrieve the link from the DB when showing the results.
I don't like how you skip some parts, assuming everyone would know what to do next. The phrasing is sometimes very patronizing (I hope I got the right word), which makes some users feel bad.
But, nevertheless, thanks again for writing the one and only tutorial on Lucene in Yii.
Highlighting Problems
Just started playing with this for a project I'm working on.
I had a problem with the results in that the highlighted search string was wrapped in html, including doctype, body etc - causing problems with UTF-8 characters because the generated doctype was wrong.
I found another function to use instead of $query->highlightMatches()
$query->htmlFragmentHighlightMatches() returns the highlighted string without the extra HTML.
No need to write your own highlighter, unless you really want to.
Word matching and Runtime folder size increase problem
Nice Search Engine..
I have used this search engine in application. I have one question about indexing. New Indexing are added everytime.. so is it increase size of application?? I mean runtime folder..
Is it worked for only whole-word matching???
Which search used in Yii Framework website???
I think this seach is used in this website also.. right??
How to change form CSS?
Hi,
I'm a beginner who uses the Yii blog to learn this framework and MVC. Ive successfully integrated this search functionality but I am wondering how to I can edit the CSS for this widget so that it also follows the form.css that exists in the Yii blog.
thanks.
Zend framework 2 doesn't have search directory in library/zend
In ZF2 search library in not in library/zend directory. Can download it from https://github.com/zendframework/ZendSearch.
Problem Index doesn't exists in the specified directory. [Solved]
For those who will have this problem the solution is to change in
protected\vendors\Zend\Search\Lucene.php this line :
public function __construct($directory = null, $create = false) to
public function __construct($directory = null, $create = true)
Regards
Do not work with Zend 2.3.1 (new Lucene)
Please update this tutorial so it works with updated Lucene in Zend 2.3.1
If you have any questions, please ask in the forum instead.
Signup or Login in order to comment.